Pawelec's Tips and Tricks - mostly scenery tutorials

Help Topics, Bug Reports, Feature Requests, etc.
Post Reply
User avatar
Pawelec
Rainbow Master
Posts: 690
Joined: Tue Jul 15, 2008 8:37 am

Pawelec's Tips and Tricks - mostly scenery tutorials

Post by Pawelec » Mon Nov 19, 2012 4:37 pm

READ FIRST:
1. These tutorials are made mostly using Unofficial MOFI Editor, so not all of the tricks shown to you will work in WA Editor (however most of them will).
2. This topic WILL be image heavy, so don't be suprised with long loading time.
3. Please don't post in this topic if that's not neccessary, you can still PM me or write in the discussion topic: http://www.pcpuzzle.com/forum/viewtopic ... 983#318983 :wink:
3a. If you want me to write a tutorial about something, if you're not sure about my methods or if you spot a mistake, DO NOT POST HERE.
3b. Posts like 'Thank you, that's really useful' or 'What's this supposed to be? I know all these things' or 'I can't wait for the next tutorial' are not needed. If you want to express your feelings, DO NOT POST HERE.
4. If you don't know how to use custom textures, custom music, or how to use General Commands, don't post it here - PM me or read official MS guide. Emerald's guide is the best if you need help. I'm writing these posts to help you learn level decorating, not using the Editor.


Keep in mind that making all the needed screenshots takes some time, so the tutorials won't come each day.

If you need to discuss about one of the tutorials, make another topic, give a link to the tutorial and discuss there. I'd like this topic to be as clear as possible.

EDIT: I forgot to say I'd like to show some of the troubles/mistakes/solutions on the real-life examples. If you have an adventure which you'd like me to decorate and then make a tutorial how did I redesign it, PM me. Trust me, I won't write something like '(Username here) is a terrible designer, and makes 12376125387651 eyecandy mistakes each time', I can be quite nice :wink:
Last edited by Pawelec on Sat Dec 14, 2013 5:26 pm, edited 8 times in total.
"Let us return to the past; it will be progress."
by Giuseppe Verdi
User avatar
Pawelec
Rainbow Master
Posts: 690
Joined: Tue Jul 15, 2008 8:37 am

WA designer's glossary of terms

Post by Pawelec » Mon Nov 19, 2012 4:38 pm

WA Designer's Glossary of Terms

IMPORTANT: If you haven't found needed information in this glossary, see:
Official MS Editor Tutorials
Unofficial Wonderland Adventures Editor Guide by Emerald141


The Basics

Basic term: Terrain - tiles that make your adventure: walls, floors, water, ice, ice walls and lava in MOFI. The LevelTexture is also a part of terrain.
Basic term: Gameplay elements - things placed in the adventure, which player can interact with, eg. buttons, gates, monsters, magic chargers, coins, gems, NPCs, transporters, teleporters, cages, firetraps.
Basic term: Eyecandy objects or Decorations - objects that player doesn't interact with; they beautify the level, eg. trees, rocks, plants, houses, ducks, butterflies, waterfalls.
Basic term: Scenery - total of terrain and eyecandy objects; all the level parts player cannot modify while playing; these make up the level's landscape.
Basic term: Objects - total of decorations and gameplay object; all the things which can be added and edited using Object panel.

Understanding what the Terrain is is really easy: all the tiles which form the landsacpe. We'd see them on a map of our level if someone wished to draw it. The Objects however are a bit more tricky.

In most of the cases FireFlower is a Gameplay Objects as well as an Object. But what if we place a FireFlower in a spot of a level which cannot be reached by player, only for decorational purposes? Well, then this FireFlower becomes part of Decorations and Scenery instead of being a Gameplay Object. Type of certain object depends on its purpose.


General

Level texture - patterns that can be used as tile sides in your adventures.
Custom textures - retexturings of the objects.

Tile Parameters

Tile Parameters - all the settings which the tile has. These are: Xtrude, Height, Logic, Top Texture, Wall Texture, Water Texture, Water Direction, Random, Corner, Edge, WHeight and WTurb.

Image
Tile panel in the Editor.

Xtrude - height of tile's walls and the tile itself.
Height - height between the tile's center and walls.
Image
1 Xtrude = 1.0, Height = 0.0
2 Xtrude = -1.0, Height = 0.0
3 Xtrude = 0.0, Height = 1.0
4 Xtrude = 0.0, Height = -1.0

Logic - the way tile behaves in-game. Can be set to:
Floor Logic - the tile can be passed by monsters, NPCs and magic spells; can be passed by diagonally.
Wall Logic - the tile cannot be passed straight nor passed by diagonally by monsters/NPCs/spells; the tile kills monsters/NPCs when they are on it.
Water Logic - the tile can be passed by magic spells, can be passed by diagonally by monsters and NPCs; the tile kills monsters/NPCs when they are on it (exception: crabs and turtles).
Ice Logic - slippery floor variant.
Ice Wall Logic - the tile cannot be passed straight nor passed by diagonally by monsters/NPCs; the tile kills monsters/NPCs when they are on it; the tile reflects magic spells.
Lava Logic (MOFI only; accessible by tile preset) - the tile can be passed by magic spells, can be passed by diagonally by monsters and NPCs; the tile kills monsters/NPCs when they are on it; also kills the players when they stay nearby for too long.

Corner - the way tile's corner is rendered in-game. Can be set to Square or Round.
Edge - the way tile's edge is rendered in-game. Can be set to Smooth or Jagged.
Image
1 Square, Smooth
2 Round, Smooth
3 Square, Jagged
4 Round, Jagged

WHeight - height of the water surface.
Image
1 WHeight = 0.8
2 WHeight = -0.2
3 WHeight = -0.8
4 WHeight = -1.5 (so the water surface isn't visible)

WTurb - height of the waves on the water surface.
Image
1 WTurb = 0.0
2 WTurb = 0.2
3 WTurb = 0.4 (so the waves appear over the floor)

Acronyms
WAE - Wonderland Adventures Editor
UME - Unofficial MOFI Editor
JET - Jafo's Editor Tools
CMD - Command
GC - General Command

Check yourself! - Wonderland Knowledge Test
Question 1: To which categories (terrain, gameplay objects, decorations, scenery or objects) would normally belong these? One thing may belong to many categories.

a) Summer Tree
b) Chomper
c) Ice Wall
d) Rubberducky
e) Blink! Charger
f) Mushroom
Answer wrote:Terrain: Ice Wall
Gameplay Objects: Chomper, Blink! Charger
Eyecandy Objects: Summer Tree, Rubberducky, Mushroom
Scenery: Ice Wall, Summer Tree, Rubberducky, Mushroom,
Objects: Chomper, Blink! Charger, Summer Tree, Rubberducky, Mushroom
Bettter quality version here.
This is still work in progress
Last edited by Pawelec on Sat Jan 26, 2013 1:05 pm, edited 28 times in total.
"Let us return to the past; it will be progress."
by Giuseppe Verdi
User avatar
Pawelec
Rainbow Master
Posts: 690
Joined: Tue Jul 15, 2008 8:37 am

Tutorial 1: Scenery basics - how NOT to make awful levels

Post by Pawelec » Mon Nov 19, 2012 4:38 pm

Tutorial 1: Scenery basics - how NOT to make awful adventures

Welcome in my first tutorial. Some of you may ask: how the hell can I know you're good at adventure decorating, you haven't uploaded adventure for ages!
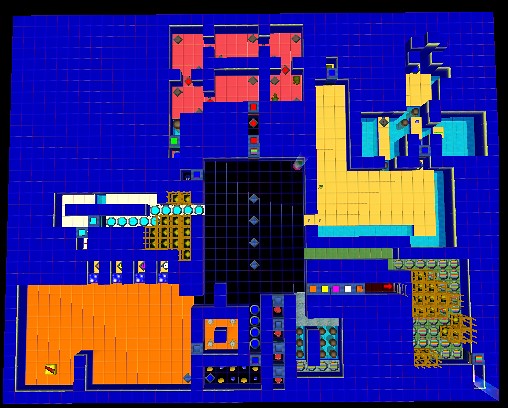
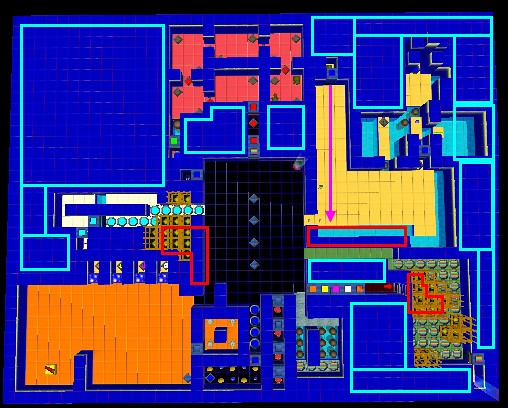
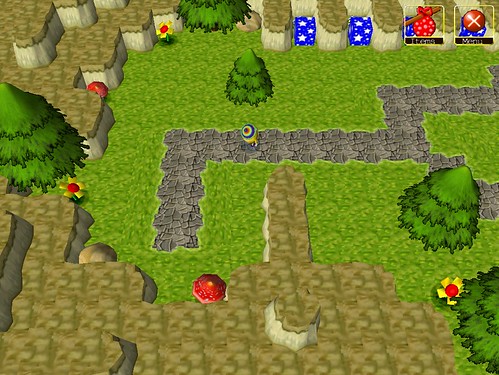
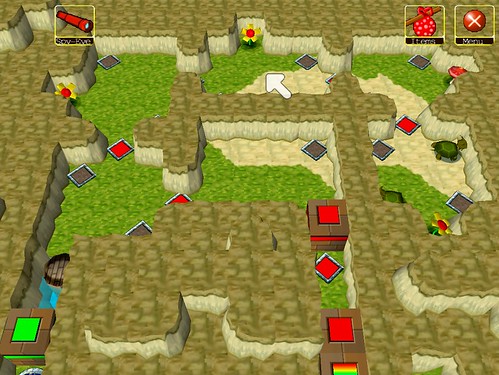
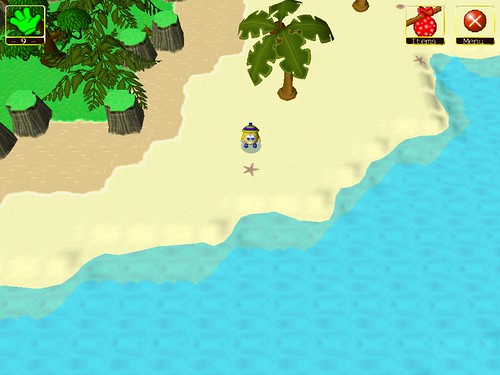
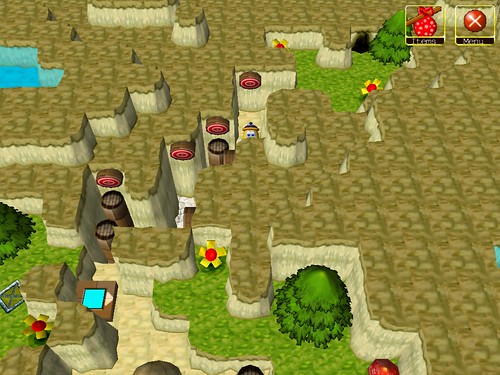
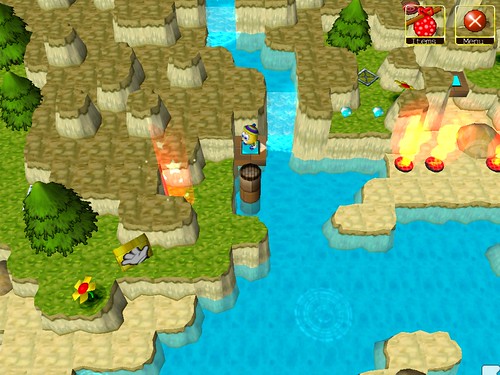
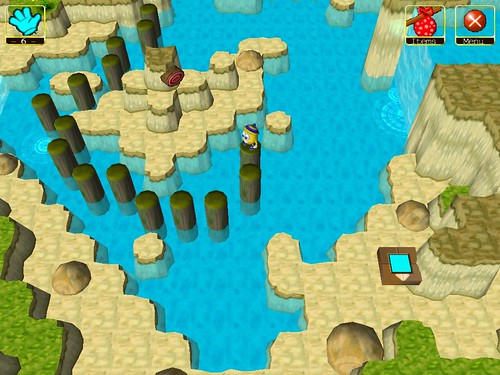
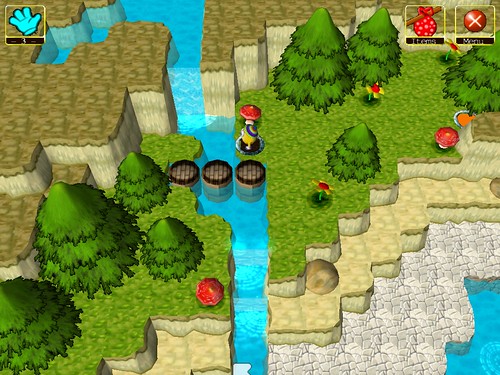
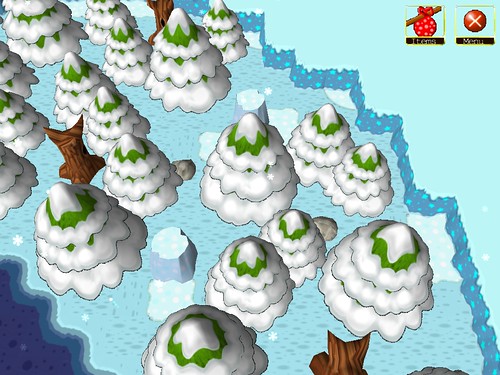
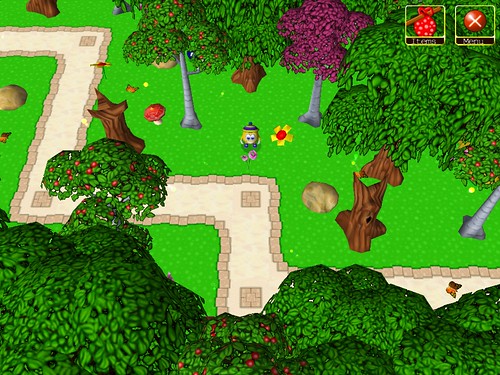
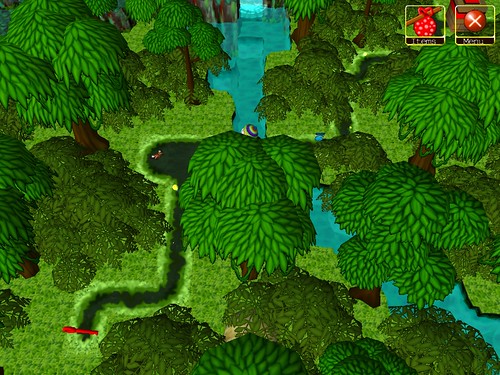
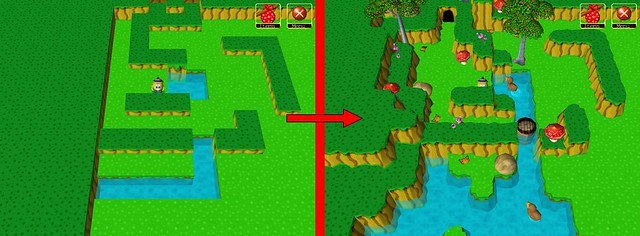
Well, let me give you some proof and show you what you'll be able to do with your adventure after reading this tutorial carefully:
Image
*There's a little lie in the text. Info about ducks and butterflies will come in one of the next tutorials.
You may wonder how long did it take me to transform the adventure into the final stage. Honestly, after some practise making something like this will take you 5-7 minutes.

You have to know there are several ways to make adventures. Before we'll move to the point of this tutorial, I have to show you the differences between them.

Method 1 - Scenery adjusting
Make the terrain and gameplay elements first, then place decorations.

This method is used by most of the Wondermakers. Why? Because working on an adventure using scenery adjusting method is really easy - make the terrain, place gameplay objects and then decorate. The big advantage of Method 1 is the buglessness of made adventures. I recommend it for all the beginners, for making a previously planned adventures and for making non-magic adventures. The big disadvantage of this is the limitation of the scenery (if you're good at decorating there are no limitations to you), but there are ways to help you (I'll show you these soon).

Method 2 - Gameplay adjusting
Make the scenery elements first, then place the gameplay objects. Change it all until it's OK.

This may seem completely pointless for many people, but trust me: there's nothing better when you're out of puzzle ideas. Make the nice scenery, place some gameplay objects randomly, test the adventure. Repeat changing the arrangement of gameplay elements until you have nice adventure. Adventures made this way need more testing than the others, due to possible bugs. Highly recommended for stunning hub areas, which doesn't feature puzzle elements and for making levels with transporters/springs/teleporters/Blink!.

Method 3 - Clever designing
Make the terrain, place the gameplay objects, decorate it all a bit. Repeat these until the effect satisfies you.

My personal favourite, but also the hardest one to use. It requies the designer to think forward. Troubles like 'I cannot put this tree here - I'll need to blink this way' are very often, but the result is worth working. Recommended for adventures with magic. Highly recommended for all the experienced makers.


Once we are familiar to the ways of designing, we can move to the eyecandy basics.


General design

:idea: Pawelec's tip: Remember that your level needs a correctly chosen theme. Don't make square adventures in forests or organically-shaped ones in Morklin's Museum.

:idea: Pawelec's tip: World's shoreline is formed by fractal-like lines. To make natural looking terrains, make sure your shores are also fractal shaped.
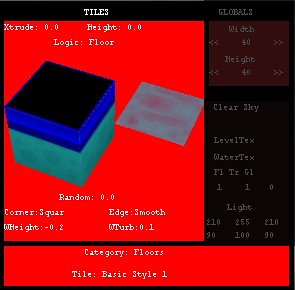
Tile adjustments

:idea: Pawelec's tip: Remember: you can set tile placement to block, so you can work faster. Also remember that placing a cursor over a certain field in Tile's Window and pressing Enter disables that setting. This way you can change only a few settings on a huge area very fast.
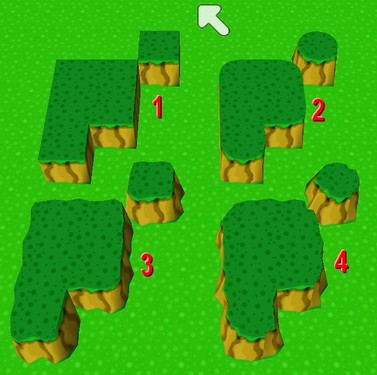
Tile edges

The tile edge is a way the certain tile is rendered. This setting consists of two parts: Corner Shape (Square or Round) and Wall Shape (Smooth or Jagged).
It's a very basic element of a scenery - using it wrong way makes your level look horrible.

:!: Common mistake: The default tile edge setting is Square, Smooth, which looks awful. Remember to change it, so the level doesn't look like enlarged Minecraft world.

Round, Jagged: most natural, for all outdoor landscapes and caves. My personal default.
Round, Smooth: best for town/city design (I know, MS uses Square, Smooth in Wondertown, but I think Round, Smooth is better), for interiors, for temples and castles.
Square, Jagged: I use it only under buttons, so I'm sure no part of the buttons floats over ground. Looks nice in mountains and deserts.
Square, Smooth: for me good in sewers and arcade games. Most unnatural setting, so I use it rarely.

:idea: Pawelec's tip: Start making a level by wiping the whole area with correctly prepared floor tile.

:idea: Pawelec's tip: The walls surrounding all the levels are set to Square, Smooth. If you want them to have other setting, make a border of walls with XTrude 1.0 and the correct edge setting.
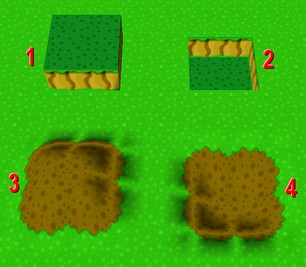
XTrude and Height

:!: Common mistake: The walls surrounding the level have XTrude of 1.0. This means that this should be your default. Using tiles of XTrude 0.5 only looks horrible, as they are lower than the level borders.

:!: Common mistake: The total tile's height is the Height setting is added to the XTrude - none of them defines the tile's real height itself.

:!: Common mistake: The Height setting affects not only the tile it's applied to, but also the surrounding ones.

:idea: Pawelec's tip: The walls at the borders don't have their outer edges visible, so make sure none of border walls is higher than XTrude = 1.0
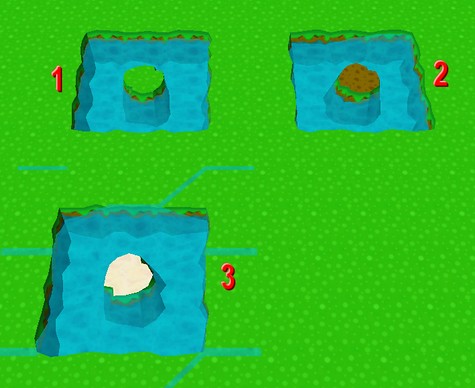
Water settings

Because water allows us to make really stunning levels, there'll be another tutorial made about this. There are the basics only.

:idea: Pawelec's tip: Setting the WaterTurb too high results in waves showing on the ground. To avoid such a situation, make sure that WTurb < XTrude + Height - WHeight

:!: Common mistake: If you make a hole/canyon with WHeight < XTrude + Height (for the math-haters: if you make a deep hole without the water visible), make sure that tiles surrounding the hole/canyon have the same WHeight as the hole/canyon has.
Why? Leaving their WHeight = -0.2 results in water showing on the tiles' edges.

Objects' parameters

:!: Common mistake: Many designers overuse Gates' steel frames and steel/rainbow colour. These can ruin your adventure's appearance easily.

:!: Common mistake: Baby chompers AREN'T nice. They are jumping around and napping like Scritters, also their shadows are too big. I don't use them in my levels.

:idea: Pawelec's tip: Custom textures allow you to make totally new lands - you can make new mushrooms, trees, ducks, flowers, butterflies... Personally I recommend you to use PhotoFiltre Studio X for graphic editing, but this program isn't freeware. Make sure your graphic software allows you to work on layers - this helps a lot.

:idea: Pawelec's tip: Make sure no wild trees or flowers are placed in rows - this looks unnatural.

:idea: Pawelec's tip: Leaving too much free space in the level makes it boring. Gently placed flower or tree can make it intresting.

:idea: Pawelec's tip: Every tree, every flower, every mushroom and every stone are diffrent. Rescale and rotate them to make groups of them look nice.

:idea: Pawelec's tip: Remember that most scenery objects behave like walls, so you can replace some of the walls with trees and rocks.

:idea: Pawelec's tip: Scenery objects have ZAdjust - you can place them on the walls, making use of soooo much free space.


This would be enough for this tutorial, if I find another common mistake I'll write about it here. The Object section isn't expanded much, because I'll give you some tips in next tutorials.
Last edited by Pawelec on Thu Nov 22, 2012 5:40 pm, edited 9 times in total.
"Let us return to the past; it will be progress."
by Giuseppe Verdi
User avatar
Pawelec
Rainbow Master
Posts: 690
Joined: Tue Jul 15, 2008 8:37 am

Post by Pawelec » Mon Nov 19, 2012 4:39 pm

Tutorial 2: Custom textures - way of making original adventures

The point of this tutorial is to show you how to use custom textures CLEVERLY and without much work.


Why should I use custom textures?

The answer is very simple: you can make new objects with them, making your adventures unique. Retexturing of eyecandy objects, such as trees and flowers, can make completely new landscapes.

How should I use custom textures?

The power of Custom textures cannot be underestimated, but they can be easily overused. There's one kind of Custom Textures which is always OK - recolourings. Coloured chompers, scritters or trees can add a nice theme to your level. There are also some retexturings (like my animal chompers, which you can find below), but you have to be careful using these.

How to store Custom Textures?

Most of designers never think about this. They put Custom Textures into [Editor Folder]/Custom. Because the level format saves the path to the texture, it has to be the same on uploader's and player's computers.
This results in complete mess in Custom folder. Tons of textures are stored there, making finding a specific one such a pain. Don't worry, there's a way to fix it.

My Custom folder is well-organised: I made a separate subfolders for textures of certain things. I have all the Chomper textures in one place, without any other images.

You have to remember that if you're the downloader, you have to put Custom Textures given by the adventure's designer the way he/she described. Otherwise you won't be able to play an adventure.


Which Custom Textures are good?

My personal answer is: all the ones that don't seem to be made using MS Paint. There are tons of awful, MS Paint-like textures on the forum.

There is no certain rule about the texture's quality. Choose what you like.


Pawelec's Base of Custom Textures
I'll be adding new Custom Textures here from time to time.

Wild ducks: Mallard male and female. They look much better than rubberduckies. You can see the female at the screenshot in Tutorial 1.
http://www.mediafire.com/download.php?l0031ovft71wnew

Coloured chompers: Orange, Gold, Green, Blue, Indigo, Purple, Violet, Black, White, Silver and Brown.
http://www.mediafire.com/?v2vm9l25dd8ev2f

Animal chompers: 3 snakes, giraffe, zebra, leopard, cheetah and tiger.
http://www.mediafire.com/download.php?z5hjhy8e2a6n89u

Tree Pack I: cherry tree, birch tree, golden and red autumn tree.
http://www.mediafire.com/download.php?a4imkvdc446468m

Mushroom Pack I: brown, orange, blue and purple mushrooms.
http://www.mediafire.com/download.php?46evnz1do481y9v
Last edited by Pawelec on Fri Jan 04, 2013 10:22 pm, edited 10 times in total.
"Let us return to the past; it will be progress."
by Giuseppe Verdi
User avatar
Pawelec
Rainbow Master
Posts: 690
Joined: Tue Jul 15, 2008 8:37 am

Tutorial 3: Fastest methods of decorating

Post by Pawelec » Mon Nov 19, 2012 4:40 pm

Tutorial 3: Fastest methods of decorating - make your level beautiful in 5 minutes!

In this tutorial I'll show you how to decorate your levels really fast - decorating this adventure took me 7 minutes. In this tutorial I use Kidkidaaa1's PotZ Submission level (topic here) to show you how to decorate your advs.

:idea: Pawelec's tip: The faster you make a level the buggier it is. If you finished the adventure in a short time, make sure you do enough testing to prevent possible bugs.


The 1.wlv of the level looks like this:
Image

Preparations

Important thing to remember while decorating is tile logic. Most eyecandy objects have 'Wall' logic.

:idea: Pawelec's tip: Mark the tiles which are neccessary to solve the level with other texture. This way you are sure you won't replace the needed tiles.

To start decorating your level you need to know which tiles are neccessary to solve the adventure. In kidkid's level we cannot remove walls surrounding orange area (spikey's would escape or fall into water) and red area (turtles would fall into water or change their paths).

On the other hand, there are some eyecandy spots. These are areas in the level which are not important to the gameplay. They are blessings for level decorators, because they can do their magic on eyecandy spots. Finding these doesn't take much time. On the picture I marked obvious eyecandy spots with blue rectangles:
Image

Red rectangles mark eyecandy spots that are a bit tricky. They have to be developed carefully, because doing something wrong to them may result in ruining the gameplay (eg. the pink arrow shows the turtle's path).

First steps to beauty

We found our eyecandy spots. What can we do next?

Kidkid's level uses abstract texture, which doesn't give us many decorational possibilities. You've already seen Hills texture on the screenshot of Tutorial 1, so I decided I'll use Wonderfalls today.

First thing I do is to wipe the level with Round, Jagged tile setting. I'm going to use waterfalls in this level, so I turned the water to flow southwards also.

The kidkid's level uses gates with ugly frame 1. I changed them all to use frame 0.
Also, there's too much colour 8, subcolor 1 buttons. I replaced them and corresponding gate with colour 3, subcolour 2.

There's also one more ugly thing in this level: cages. But, wait, are all of them neccessary? Well, not really. Only the outer ones affect gameplay. Let's delete inner ones and place walls where they were.

Green buttons area still looks bad. I think we can replace top-right button with a wall to make the room look more natural.

Black area in the middle can be smaller. We can use it's borders like eyecandy spots.

After these changes it look like this:
Image

Now we can start real decorating.

The decorating process

Now I'll do the decorating magic to this level. First, I'll change the shape of the eyecandy spots, so the level looks more naturally.

Next, I'll change the floor texture in some parts of the level. This step done cleverly can make each adventure beautiful. Because we want this adventure to be natural, I'll use some stone and sand textures.

Then I'll add some flowers, trees, rocks and mushrooms. Remember not to place them in rows! Also, I make some gaps in the walls to fit the decorations.

When all the eyecandy objects are placed I make walls with Xtrude 2.0 and use them to beautify the walls. After that I check if all the walls textures are correct (Xtrude of 0.5, 1.0, 1.5 and 2.0 have their own textures).

In the end, I make tile with WHeight 0.8, Xtrude 0.5 to make water stream ontop the wall and I add a waterfall.

Final effect seen in the Editor:
Image

Screens after remaking:
Image

Image

Image

Image

Image

Image


To sum up: the fastest methods of decorating are:
- wiping the level with correctly prepared corner and edge settings,
- using various floor textures,
- making natural looking terrain,
- adding some trees, flowers etc.,
- using Xtrude 2.0 walls ontop the Xtrude 1.0 ones,
- making water on the walls by WHeight 0.8, Xtrude 0.5 and then adding a waterfall.

I didn't use these in this tutorial:
- placing trees, flowers etc. on the walls,
- adding some holes in the ground.

Topic can be seen in better quality here: http://pawelec.create-a-forum.com/t17-t ... minutes#26.
You do not have the required permissions to view the files attached to this post.
Last edited by Pawelec on Wed Dec 05, 2012 9:09 pm, edited 4 times in total.
"Let us return to the past; it will be progress."
by Giuseppe Verdi
User avatar
Pawelec
Rainbow Master
Posts: 690
Joined: Tue Jul 15, 2008 8:37 am

Tutorial 4: Awesome water - wetter than ever

Post by Pawelec » Mon Nov 19, 2012 4:45 pm

Tutorial 4: Awesome water - wetter than ever

Water basics

There are some basic rules about making water in WA. First, make sure that tiles surrounding the water body have the same WHeight and WTurb values as the water itself, so there are no 'dry' nor 'flying water' spots. Tiles with WHeight > Xtrude (saying in a clearer way: with water over their surface) should have a water-specific tile texture.

Also, make sure you adjust the side tile texture for the walls - each level texture has 4 variations of wall side texture, each for different wall height (0.5, 1.0, 1.5, 2.0). Remember to adjust these, so no textures are weirdly enlarged by the rendering system of Blitz3D.

Water types

You aren't limited to classic, blue water. You can use acid green liquid and lava as a water texture. There are also abstract voidish and rainbow patterns.

Lowered water bodies

The WAE default for water bodies is to make a water surface on -0.2. This isn't your limit! Remember you can make it lower, making cliffs the player can walk on, or higher making a swamp which covers the ground. This is nicely used by designers, eg. TheThaumaturge in Stepping Stones adventure and unfinished Rainbow's End masterpiece by Com Rante.

Using that feature requires the maker to carefully adjust WHeight and WTurb setting, because all the mistakes are easily spotted.

:idea: Pawelec's tip: Use bridges with sound set to Mecha over lowered water bodies, because the Water ones make circle waves when toggled.

Waterfalls

These look great and are easy to make. Combination of waterfalls and lowered water bodies looks awesome most of the times.

:!: Common mistake: You should use one waterfall for one stream - three waterfalls placed next to eachother look ugly.

There are four things to remember about waterfalls:
1. The water flowing in the top of the waterfall has to have WTurb = 0.0.
2. The wall under the waterfall has to be Round, Smooth so the jaggs don't break through the waterfall.
3. Both walls next to waterfall's edges have to be Square.
4. Walls around the upper stream should have WHeight and WTurb of the stream's tiles.

:idea: Pawelec's tip: Sometimes beauty comes to math. Upper WHeight is the WHeight of the water over the waterfall, Bottom WHeight is the WHeight of the water below.
Image

:idea: Pawelec's tip: The deafult settings of the waterfall.wop are adjusted for the upper stream of WHeight = 0.8 and the lower of WHeight = -0.2.

:idea: Pawelec's tip: Use the water background texture over the stream tiles.

MOFI Waterfalls can be set to Data0=1 for lavafalls and Data0=2 for acidfalls.

Other water objects

Ducks: Always set these to move, because duck swimming still is looking weird. Be careful, as the ducks' logic is wall, so they stop spells, transporters etc. If you make lowered water body, don't use these - they move all around water logic tiles, in this case going into walls.

Steam: Makes some steam spray in one direction. With intesity set to High looks strange.

Spray: Makes water fountain/geyser. Can be used creatively.

Splish: My personal favourite. By default gives away small circle waves on the surface, but with changes ParticleID makes awesomely looking mist.

BridgeEnd: Nice, two things to remember about it: it doesn't change the tile's logic to Floor itself, also it's only 5 tiles high.

Watervines: MOFI only, look nice almost everywhere (exception: beaches).

Waterwheel: MOFI only, looks nice compared with a waterfall.

MOFI-like beaches

Image

Beaches. These are areas first introduced in MOFI. How is the sea made?
Nothing simpler.

1. Take a floor tile and set its logic to Water.
2. Change its texture to the water one (for MOFI beach it's the plain blue one).
3. Set its Height to -0.5.
4. Use the prepared tile to make water bodies.
5. Adjust the texture of the water borders, not the land borders.

Then add some seastars and shells to the sand. Then add wet sand and grass further into the land. If you use MOFI make some palms on the sand and jungle plants/trees over the grass.

Example adventure and screenshots
Like in the last tutorial, adventure for you (mine this time) and some screens of it.

Image

Image

Image

Image

Image

Topic in better quality at: http://pawelec.create-a-forum.com/t23-t ... an-ever#35
You do not have the required permissions to view the files attached to this post.
Last edited by Pawelec on Sat Dec 29, 2012 11:42 am, edited 2 times in total.
"Let us return to the past; it will be progress."
by Giuseppe Verdi
User avatar
Pawelec
Rainbow Master
Posts: 690
Joined: Tue Jul 15, 2008 8:37 am

Tutorial 5: Forest tutorial

Post by Pawelec » Thu Nov 22, 2012 5:30 pm

Tutorial 5: Plant a tree here, plant a tree there and you've got a forest

Hello again! Today we have a forest tutorial. This is going to be different than the previous tutorials, as I'll give you some major tips and rules first, and then I'll show you the 'recipes' for certain types of forests.

Major rules of forestation

As I mentioned in the first tutorial:
:idea: Pawelec's tip: Make sure no wild trees or flowers are placed in rows - this looks unnatural.
:idea: Pawelec's tip: Every tree, every flower, every mushroom and every stone are diffrent. Rescale and rotate them to make groups of them look nice.

What's more:
:idea: Pawelec's tip: Most of the forests are full of animals. This means you should use creatures in your forest levels.
:idea: Pawelec's tip: You have to be careful if you make paths through the forests - if you want them to be easily recognised, make sure the tree leaves don't cover them.
:idea: Pawelec's tip: Trees and other plants like water. Use it in addition to your forests to make an epic landscape.
:idea: Pawelec's tip: If you need a tree species which is not included in WA, you can use custom textures on the existing trees.

These are the most basic things you should remember. Not all facts are obvious however:

:idea: Pawelec's tip: Glowworms can change the mood of whole level. They look especially nice flying between trees in the dense forest. These small insects seem to be forgotten by level designers.
:idea: Pawelec's tip: Remember to make the tree leaves cover the level borders, this makes the forest look much bigger.
:idea: Pawelec's tip: The best looking trees are the ones with ScaleAdjust between 1.1 and 0.7. Use the bigger and smaller ones carefully, because resizing the object makes its texture resized too. This can make tree leaves look unnaturally big or small.
:idea: Pawelec's tip: Scritters are perfectly harmless to the player. Consider using them as eyecandy objects if the forest area has no gameplay purpose.

Evergreen Forest, Forever Forest variant

Image

Texture: Forever Forest

Ingredients:
Spruce trees,
some bare trees,
sandstone rocks,
brown mushrooms (from Mushroom Pack I),
green glowworms.

Optionals:
Darkness,
some autumn trees,
yellow flowers,
rainy weather,
red mushrooms.


Evergreen Forest, Wonderfalls variant

Image

Texture: Wonderfalls

Ingredients:
Spruce trees,
some bare trees,
sandstone rocks,
red mushrooms,
yellowish glowworms,
yellow flowers,
butterflies.

Optionals:
Darkness,
some autumn trees,
rainy weather,
orange mushrooms (from Mushroom Pack I).


Winter Forest

Image

Texture: Foggy Mountains or Sundog Island

Ingredients:
Snowy spruce trees,
some bare trees,
gray rocks,
cyan glowworms,
snowy weather.

Optionals:
Some ice walls,
ice itself,
blizzard weather,
blue mushrooms (from Mushroom Pack I)


Autumn Forest

Image

Texture: Wonderfalls or Windy Hills (if using Windy Hills, use the dirt, not the grass)

Ingredients:
Autumn trees (including the red and gold variant from Tree Pack I),
bare trees,
sandstone rocks,
red mushrooms,
yellow flowers,
some butterflies.

Optionals:
Rain weather,
darkness,
red, orange and yellow glowworms,
brown and orange mushrooms (from Mushroom Pack I)
also if using MOFI reddish plain plant.


Summer Forest

Image

Texture: Windy Hills

Ingredients:
Summer trees,
some bare trees,
apple trees,
some purple trees,
sandstone rocks,
red mushrooms,
yellow flowers,
some butterflies.

Optionals:
Rain weather,
darkness,
green and yellow glowworms,
purple flowers,
purple and orange mushrooms (from Mushroom Pack I)


New Year's Special: MOFI-less jungle

Image

Texture: MOFI Jungle

Ingredients:
2 custom trees from the Jungle Pack,
ferns from the Jungle Pack,
butterflies from the Jungle Pack,
sandstone rocks,
default (yellowish) glowworms,
greenish light.

Optionals:
Rain weather,
darkness.

Note on how to make ferns:
1. Use an apple tree with a texture Custom\Tree\fern2.png.
2. Adjust the parameters to something like:
a) ZAdjust = -3.2, ScaleAdjust = 1.1
OR
b) ZAdjust = -3.8, ScaleAdjust = 1.3


Of course there is an example adventure. The forum told me the attachment was too big (it's 820 KB), so here's the link: http://www.mediafire.com/download.php?ul1etuls44ik7gu (requires Tree Pack I, Mushroom Pack I and Jungle Pack, MOFI Jungle and Wonderfalls textures, MOFI 08.ogg jungle theme).

Also, tutorial in better quality: Tutorial 5: Plant a tree here, plant a tree there and you've got a forest
Post Reply